Schedorhinotermes intermedius
Distribution
Soldiers
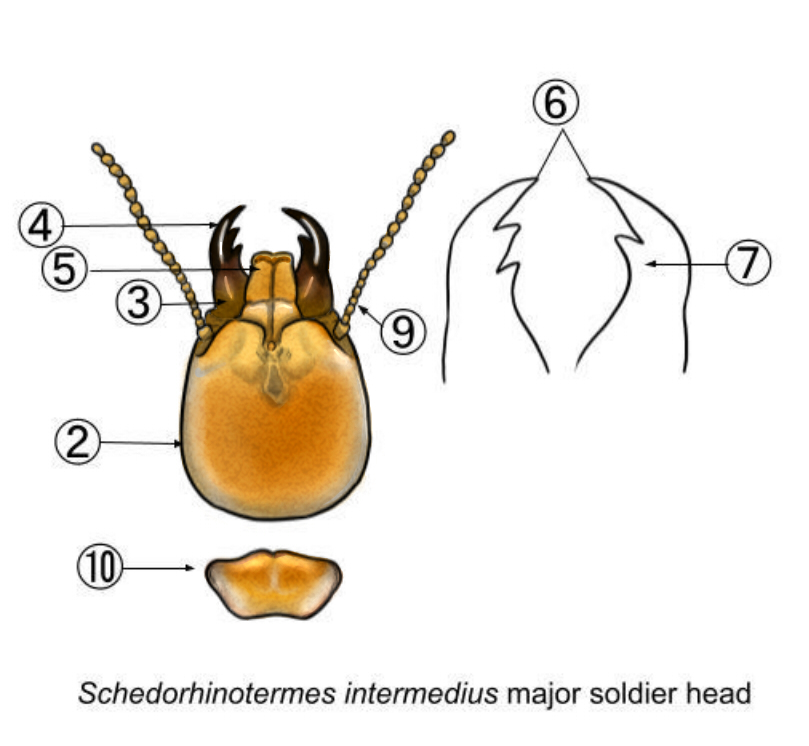
Major Soldier. Major soldiers measure 5.50–7.00 mm in length
- Topside light yellow in colour – a little darker than the rest of its body
- Head is large and rounded on the sides and behind
- Base of mandibles yellow-brown
- Apical half of mandibles reddish brown
- Labrum a little longer than wide
- Mandibles evenly curved inwards at the tips;
- Right mandible without a very short tooth between the base and the large tooth
- Antennae of 16–18 segments
- 4th antennal segment shortest of all
- Pronotum shorts and wide and bent up in the middle
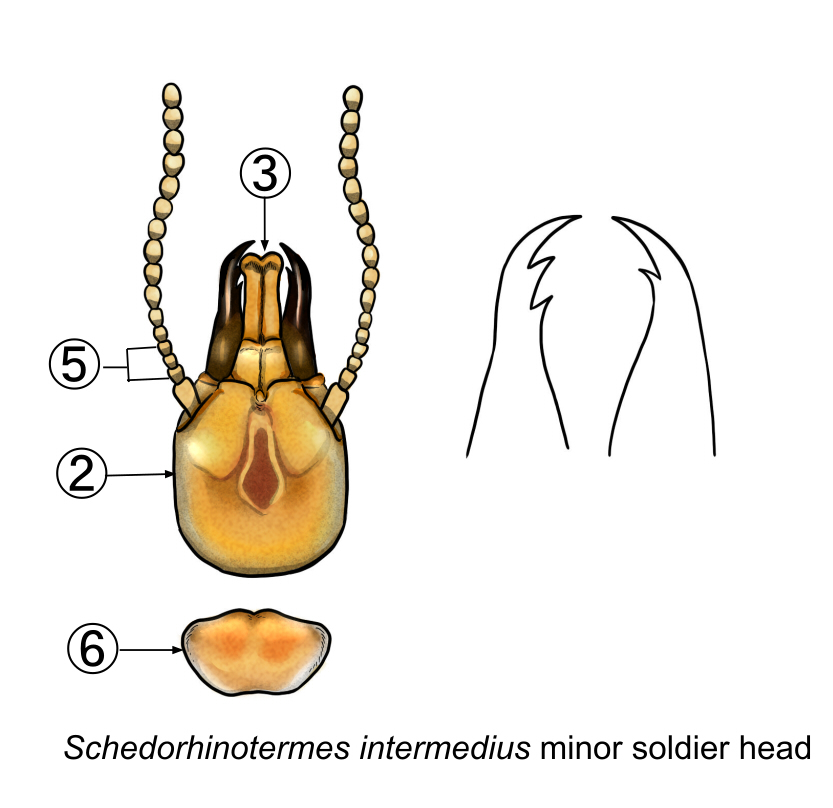
Minor Soldier. Minor soldiers measure 3.50–4.50 mm in length
- Same as the colour of the major soldier
- Head with parallel sides, rounded behind
- Labrum extends to the tip of the mandibles
- Antennae of 15–16 segments
- 4th antennal segment as long as or shorter than the 3rd segment; 3rd segment almost always shorter than 2nd
- Pronotum similar to major soldier
General Treatment Procedure
Inspection Procedure
Arrive at the customer’s address on time and view the site from a distance. Pay attention to:
- The surrounding land;
- Where the water flows and pools;
- Sagging timbers or building structures;
- Trees;
- Retaining walls; and
- Neighbouring properties.
Look for evidence of previous termite treatments as you approach the front door such as drill holes in concrete and termite baiting systems.
To gain access, you must introduce yourself to the occupant and explain the work order, confirm the client’s request, and ask about the pest problem using a friendly and professional tone.
You must use the following introduction or something similar:
“Good morning Mr/Ms [Occupier’s last name] my name is [Your name] I am here to treat [inspect] your home for [pests included in the job allocation]. Is there anything, in particular, you want me to pay attention to?”
Explain to the client the procedure for the inspection and ask if there are any areas they are particularly concerned with. Take note of any information you think will be helpful with the inspection.
External Inspection
Start the inspection with the external areas of the property.
- Note or take pictures of the presence of active termites and their species
- Note or take pictures of the damage caused by the termites
- Note all conducive conditions and pay extra attention to those areas during the internal inspection
- Inspect all trees within 50 metres of the building
- Inspect every piece of loose timber
- Inspect every retaining wall
- Check the meter box for a durable notice and record the details
- Check the perimeter of the structure to determine whether an inspection zone is required and the complaint
- inspect the integrity of any physical barriers
- Make a mental map of the structure and note:
- The number of roof voids
- The presence of a subfloor
- The general dimensions of the structure
If a subfloor is present:
- begin the inspection at the entry;
- inspect the perimeter of the subfloor first:
- compare the shape and size of the area inspected to the shape and size expected from the external inspection, and
- note any inaccessible areas.
- Inspect the entire subfloor in a grid pattern ensuring you inspect every side of every pier in every area of the subfloor, paying special attention to:
- termite shields;
- subfloor walls;
- attached piers;
- all loose timber;
- joists and bearers;
- floorboards;
- plumbing and other penetrations;
- conducive conditions; and
- note any areas that may require further inspection.
Notify the customer once the external inspection is finished and ask permission to enter the structure.
Internal Inspection
Before entering the building, remove your shoes or use overshoe covers.
- Begin inspection at the front door and systematically sound every piece of exposed timber in the interior using a ‘Donger’.
- Strike all wall linings with the palm of your hand or a clean rubber mallet and listen for falling termite mud or audible signs of termites.
- Visually inspect all surfaces of all walls and exposed timber for signs of timber pest activity.
- Inspect doors and door jambs for sagging.
- Use Tramex moisture meter to take all required measurements of all wall linings and exposed timber, including but not limited to:
- Wall linings at lateral intervals of 600 mm at three levels;
- High
- Middle;
- low;
- Exposed timber at lateral intervals of 200 mm or at least 3 places;
- Use a Listening Device or other authorised equipment to further investigate areas of suspected timber pest activity;
- Note any inaccessible, restricted or obstructed areas;
- Note areas that require special attention when inspecting the roof; and
- Note access points to the roof and compare them to your mental map of the structure to ensure access is available to all roof areas of the structure.
- Wall linings at lateral intervals of 600 mm at three levels;
Inspect Roof Void
- visually inspect the perimeter of every roof void and sound every piece of exposed timber;
- systematically inspect and sound every piece of timber in the roof void;
- note inaccessible or restricted areas; and
- refer to www.fedpest.com for OHS policies relevant to inspection within roof voids.
Post-Inspection Procedure
- Advise customers they will receive a comprehensive written report via email or in the post.
- Complete the invoice and collect payment.
- Report your findings in accordance with AS 3660.2 and AS 4349.3 using Federal Pest Control-approved software including the following:
- You must ensure you discharge your duty to the customer by reporting your findings factually and properly with due regard that your advice and recommendations may be used as the basis of a large financial decision.
- Reports must be completed and uploaded to the Federal Pest Control booking system on the day of the inspection.
- Federal Pest Control as the name of the firm issuing the timber pest inspection report;
- the name of the inspector;
- the name and address of the client;
- date of the inspection;
- the address of the property inspected;
- description and identification of the buildings or other timber structures inspected;
- any areas not inspected;
- where termite activity is detected, the genus and, where practicable, the species of termite involved and its potential to cause significant structural damage;
- presence of timber pests, other than in item (h) above, identification of pest with recommendations for remedial measures;
- evidence of inactive timber pest infestation;
- evidence of timber pest treatment;
- location of pest damaged timbers and general description of the severity of damage of affected timbers such as slight, moderate or extensive;
- recommendations for additional investigations or specialised inspection, especially where there is significant damage present, or where the risk of timber pest activity is high;
- recommend control, remedial or protective measures;
- areas where inspection was restricted such as by insulation, air conditioning ducts for pipework, with recommendations for gaining access where necessary;
- inaccessible areas such as enclosed patios, concrete slab on ground floors, fireplace hearths, double brick cavity walls or flat roofs, with recommendations for gaining access where considered practical, and protective measures in such areas where the risk of timber pest activity is high;
- areas with excessive moisture caused by such factors as poor ventilation, ineffective drainage, leaks or defective flashing with recommendations for reducing moisture levels, areas conducive to infestation; and
- Recommendations for frequency of future inspections.
- You must provide a report to the client.
- Contact the client to explain the content of the report.
- A proposal for the installation of a Trelona Advance Termite Bait System must be prepared uploaded to the Federal Pest Control booking system and provided to the client on the day of the inspection and must include:
- a minimum, one in-ground/in-concrete station for every three lineal metres of perimeter measured under the drip line;
- description of all structures to be protected;
- the presence of live termites in the structure or on the property;
- the species of termite, where applicable;
- when the warranty will be available; and
- a site plan.
- Contact the client to explain the method of operation and benefits of the Trelona Advance Termite Bait System including:
- the placement of the Exterra stations around the perimeter of the structure creating a complete and continuous termite interception zone;
- the monitoring of the stations every three to six weeks by a fully qualified and licenced termite inspector;
- the addition of patented Focus termite attractant to every station; and
- the baiting of active stations with non-toxic Requiem termite bait to achieve colony elimination.
- All contact/follow-up with the client must be noted in the job notes.
Treatment Methods
Baiting System
Trelona Advance Termite Bait System is an in-ground bait system that is powered by the insect growth regulator, Novaluron. Since Trelona ATBS is not registered as an above-ground baiting system, it can also be used in combination with BSAF’s termiticides, Termidor Residual Termiticide, Termidor HE, and Termidor foam for an effective management system fit for different situations.
Installation
In-ground
ATBS stations should be installed approximately 3 meters apart and 300–600 mm from the external walls of the structure. The stations can also be placed in additional areas where there are active termites or where conducive conditions are present around the property.
To create the opening for the ATBS, use a 75-80 mm auger and excavate at least 170mm in depth to create a finish close to the ground level. If possible, an additional 50-80 mm below the depth of the base of the station should be excavated to create to allow excess moisture to drain.
Insert the station in the excavated hole until the dollar is resting on the soil. If the collar is not resting on the soil, you step on it since ATBS stations are designed to withstand direct force. Once the in-ground stations are placed, you may ass the monitoring components or the Trelona bait cartridges.
In-concrete
In situations where it is necessary to put stations in concrete or tarmac, you must cut through the surface to be able to install in-concrete stations. Cutting concrete or tarmac should be done by a professional or a company that specializes in this field. Utility services should be identified before starting this procedure.
Once the core is cut out, remove the extra soil under the concrete to make room for the Advanced Concrete Bait Station (CBS). Check if the station fits the hole. The sleeve should be at least 5 mm below the depth of the base steel cap. If the sleeve goes down too deep, add some soil back into the hole.
Once the sleeves are installed properly, you are ready to add the monitoring or bait components and fit the steel cap.
Monitoring System
The monitoring system is comprised of a Timber Monitor Base (TMB) and a Termite Inspection Cartridge (TIC) that contains purified cellulose. The TMB is placed at the base of the station, followed by the TIC on top. Be sure to wear disposable gloves when handling these components to avoid contamination that could avert termites from entering the station. Once the two components are in place, use the spider key tool to lock the lid in place.
After installing the ATBS stations, map your stations using a site plan. Number each station so they can easily be identified for future reports. Keep the site plan up to date as stations might be removed or added in the future.
The stations should be monitored 8-12 weeks apart until termites are intercepted. If Mastotermes darwiniensis is present, inspections should be carried out more frequently. Replace the TIC at least every 24 months.
Maintaining a Monitoring System
- Remove lid of the station using the Spider key tool, and remove the inspection cartridge using long nose pliers or a probe. Check the TIC for any termite activity.
If there is no termite activity, proceed to step 2
If there is termite activity, proceed to step 5
- If you need to replace the TMB, use the pliers to remove the timber monitor and dispose properly. Clean the station if there is any debris that would make installation of the new TMB difficult. Place both halves of the new TMB into the bottom of the station.
- Replace the TIC if it has been affected by mould or if it has been rendered unusable. If the TIC is fine, place it back in the station on top of the TMB. Replace the TIC at least every 24 months.
- Place the lid back and lock it using the Spider key tool. Update your inspection report. Inspections can be scheduled in another 8-12 weeks after this. No further steps are needed.
- If active termites are found in step 1, change the TIC to a Trelona Termite Bait cartridge. Use disposable gloves when handling and removing the TBC from its plastic packaging. No need to add water to the TBC. place the lid back on the station using the key and update your report. Inspect the station again at 4-8 weekly intervals.
- Once the colony has been eliminated, you may replace the TBC with a TMB and TIC. re-establish the monitoring program at 8-14 week intervals.
Trelona Termite Bait
The Trelona Bait Cartridge (TBC) contains the same purified cellulose as the inspection cartridge with Novaluron, a chitin synthesis inhibitor IGR. When the termites take the bait back to the colony, the active ingredient will inhibit the production of chitin – a complex carbohydrate essential for the formation of an insect’s exoskeleton. Without chitin, the termites will not be able to moult and then they will die properly and this will lead to the collapse of the colony.
When active termites are found on an inspection of the monitoring system, you must change the TIC to a Trelona bait cartridge. Wear disposable gloves and remove the plastic packaging of the TBC and place it into the station. Take note of this change in your report. Inspect the station at 4-8 weekly intervals, and replenish the baits as needed.
Active on Application (AoA)
The Trelona Termite Bait can be added to the stations as an active bait from day one. During the installation, you put two 124g bait cartridges in each station. Remember to wear disposable gloves while handling the cartridges to prevent contamination. Inspect the AoA system at 3-6 monthly intervals until termites are intercepted. If Mastotermes darwiniensis is present, inspections should be carried out more frequently. The first inspection can be carried out 1-2 months after the installation should the structure be under attack.
Maintaining AoA System
- Remove lid of the station using the Spider key tool, and remove the bait cartridges using long-nose pliers or a probe. Check both cartridges for any termite activity.
If there is no termite activity, proceed to step 2
If there is termite activity, proceed to step 3
- Replace the cartridge if it has more than 50% consumption, mould, or other issues that make it unusable. Replace the TBC at least every 24 months.
- If there are active termites and more than 50% of the bait is consumed on either of the TBCs, they should be replaced. Replace the TBC at least every 24 months.
Place the lid back and lock it using the Spider key tool. Inspect active stations on a 6-8 weekly basis and replenish if necessary. Once the colony has been eliminated, inspection can be carried out at 3-6 monthly intervals.
Chemical barrier
External Perimeter
Use Termidor SC, a non-repellent termiticide with Fipronil as an active ingredient. This product lasts for over 10 years and kills termite colonies in as little as 90 days.
- Use a shovel to make a 15 cm wide and 15 cm deep trench around the foundation of the house.
- Once the trench is done, mix at the rate of 4 gallons (0.06% or 0.125% Termidor SC) per 10 linear feet per foot of depth.
- Evenly distribute the termiticide mixture over the trench.
- Once the trench has been filled and treatment has dissipated into the soil, put back the dirt that was taken out of the trench, but make sure to treat it first. If you don’t treat this soil, the termites that stay on the surface will skip the termiticide and they won’t die.
- Mix the termiticide into a 1-gallon pump sprayer
- Spray the dirt with the solution and shovel the treated dirt back into the trench. This is easier with two people, where one person is spraying the dirt down as the other person is pushing the dirt back into the trench.
- Work your way around the perimeter of the house until the trench is completely filled in with the treated soil.
Foam Treatment
Termidor foam can be used as a localized treatment to control subterranean termite infestations. Foam treatments should be used together with other termite control methods such as soil treatment, foundation treatment, bait systems, etc. and not as a stand-alone treatment. Use Termidor foam to treat galleries inside wall voids, shower voids, around bath traps, and other possible sites of infestation. Use the foam to treat known or suspected infestations. Hold the injector tip for about 8 seconds, allowing it to expand for up to 30 times its initial size. This allows the foam to spread and travel through the galleries inside the wood and makes it impossible for termites to escape.
Drilling holes may be necessary to gain access to the known or suspected galleries. Drill the holes at 1 or more locations along the galleries. Using a moisture meter can aid in determining the spread of the treatment. Plug the drilled holes after the treatment using putty or other appropriate materials.
Leave a Reply